Basic Checkmate Patterns: The Four You Must Know
Winning a chess game means delivering checkmate, and most checkmates follow a handful of recurring shapes. Learn these four fundamental patterns and you will start finishing off games you used to let slip away, while spotting the same threats aimed at your own king in time to stop them.
Analyze Your Games FreeWhy Learn Checkmate Patterns?
Checkmate is the only way to actually win a game of chess, yet many beginners reach a completely winning position and then have no idea how to finish. They chase the enemy king around aimlessly, let it slip to safety, or worse, accidentally stalemate and throw away the full point. Knowing the standard mating patterns turns those wasted chances into clean, confident wins.
The reason patterns matter is that almost every checkmate you will ever deliver is a variation of a familiar shape. Grandmasters do not calculate mate from scratch every time; they recognize the picture instantly because they have seen it thousands of times. When you learn the back-rank mate, the ladder mate, the king-and-queen mate, and the smothered mate, you are building the same visual library that lets strong players spot a finish in a fraction of a second.
These four patterns were chosen because they cover the situations you meet most often: a king trapped behind its own pawns, a lone king being driven to the edge, converting a queen advantage, and a king boxed in by its own pieces. Master them and you will both win more games and, just as importantly, recognize when the exact same danger is pointed at you.
What Every Checkmate Has in Common
A checkmate is simply a check that the king cannot answer. Every pattern below is just a different way of satisfying these three conditions at the same time:
- 1
The King Is in Check
Some piece must be attacking the king right now. This sounds obvious, but many missed mates happen because a player sets up a beautiful cage and then forgets that the final move also has to deliver check.
- 2
The King Cannot Move to Safety
Every square next to the king is either off the board, occupied by a friendly piece, or covered by an enemy piece. Notice that the king's own army can be its worst enemy here, blocking the very squares it needs to flee to.
- 3
The Check Cannot Be Blocked or Captured
The defender cannot interpose a piece between the checker and the king, and cannot capture the checking piece without being recaptured. When the checking piece is defended, or is a knight (which cannot be blocked), this condition is easy to meet.
Back-Rank Mate
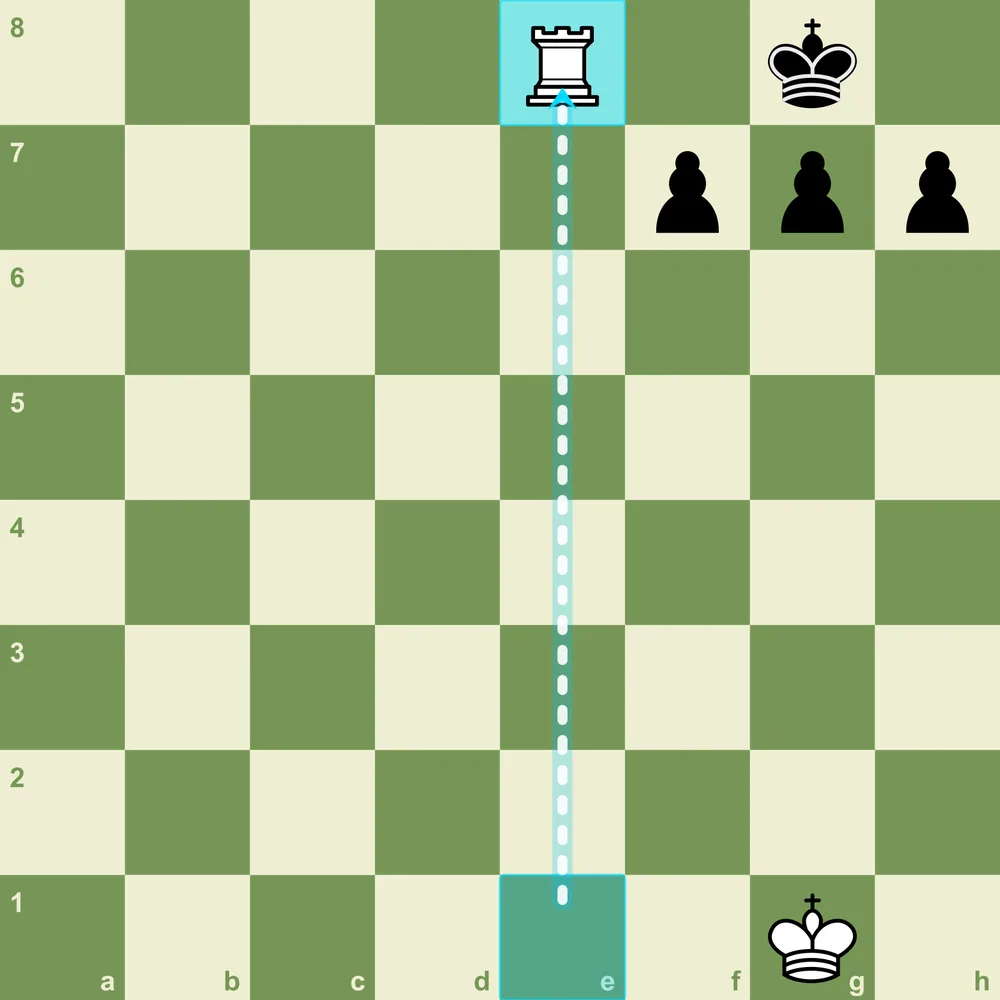
The back-rank mate is the pattern beginners fall victim to most often, which is exactly why it should be the first one you learn. A castled king sits on g8 behind an untouched wall of pawns on f7, g7, and h7. Those pawns kept the king safe all game, but they have now become a prison: when a rook or queen slides to the back rank and gives check, the king has nowhere to run because its own pawns block every escape square in front of it.
How it works is beautifully simple. The heavy piece delivers check along the eighth rank, the check cannot be blocked because there is nothing between the rook and the king, and the king cannot capture the rook because it is too far away or the rook is defended. All three conditions for mate are met in a single move.
To set it up, you need two things: control of the back rank and a king that is trapped by its own pawns. Often the winning idea is to first eliminate or distract the enemy rook that guards the eighth rank, then invade with your own rook or queen. Look for enemy back ranks that have no defender, and remember that a defender pinned or overloaded elsewhere counts as no defender at all.
Avoiding it is just as important. The single best habit is to create luft, a German chess term for “air,” by nudging a pawn forward with a quiet move like h3 or g3 (h6 or g6 as Black) when you have a spare moment. That one pawn move gives your king a flight square and turns a lethal back-rank check into a harmless nuisance. Keep a rook or queen watching your back rank, and think twice before trading away the only piece defending it.
Two-Rook (Ladder) Mate
The two-rook mate, often called the ladder or staircase mate, is the most reliable way to checkmate a lone king when you have two rooks (or a rook and a queen). It is worth learning early because it works from any position and requires no calculation once you understand the technique. The rooks take turns like the rungs of a ladder, walking the enemy king backward until it runs out of board.
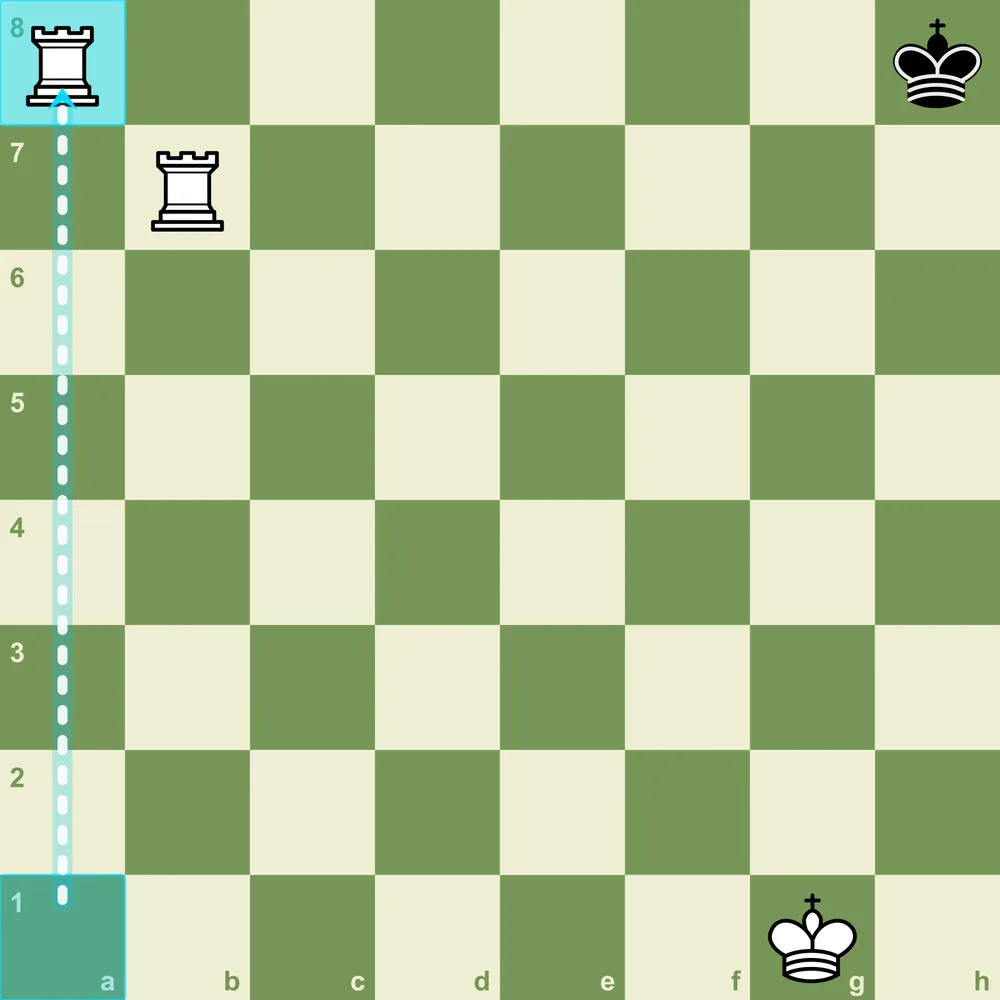
How it works: one rook controls an entire rank, forming a wall the king cannot cross. The second rook then checks the king on the next rank, forcing it to step back. Now the first rook jumps forward to seal off that new rank, the king is checked again, and the process repeats. Rank by rank the king is squeezed toward the edge, where the final check leaves it no square to move to and no way to block or capture. In the diagram, one rook fences the seventh rank while the other delivers the checkmate on the eighth.
To set it up, always keep both rooks a safe distance from the enemy king, ideally on the far side of the board so the king can never step across and capture one. If the king ever approaches the rook that is doing the checking, simply slide that rook to the opposite end of its rank, keeping it active but out of reach, and then continue the ladder.
The mistake to avoid when executing this mate is letting the king attack a rook or, worse, giving a check that lets the king approach both rooks at once. As long as you keep your rooks far from the king and only advance the back rook after the front one has cut off a rank, the technique is foolproof. There is also no stalemate risk here, because the king always has forward squares available until the very last move.
King and Queen Mate
The king-and-queen mate is the single most useful checkmate to know, because promoting a pawn to a queen or simply being up a queen is one of the most common ways games are won. The queen alone cannot force mate, so this is really a team effort: the queen does the confining while your own king delivers the crucial support.
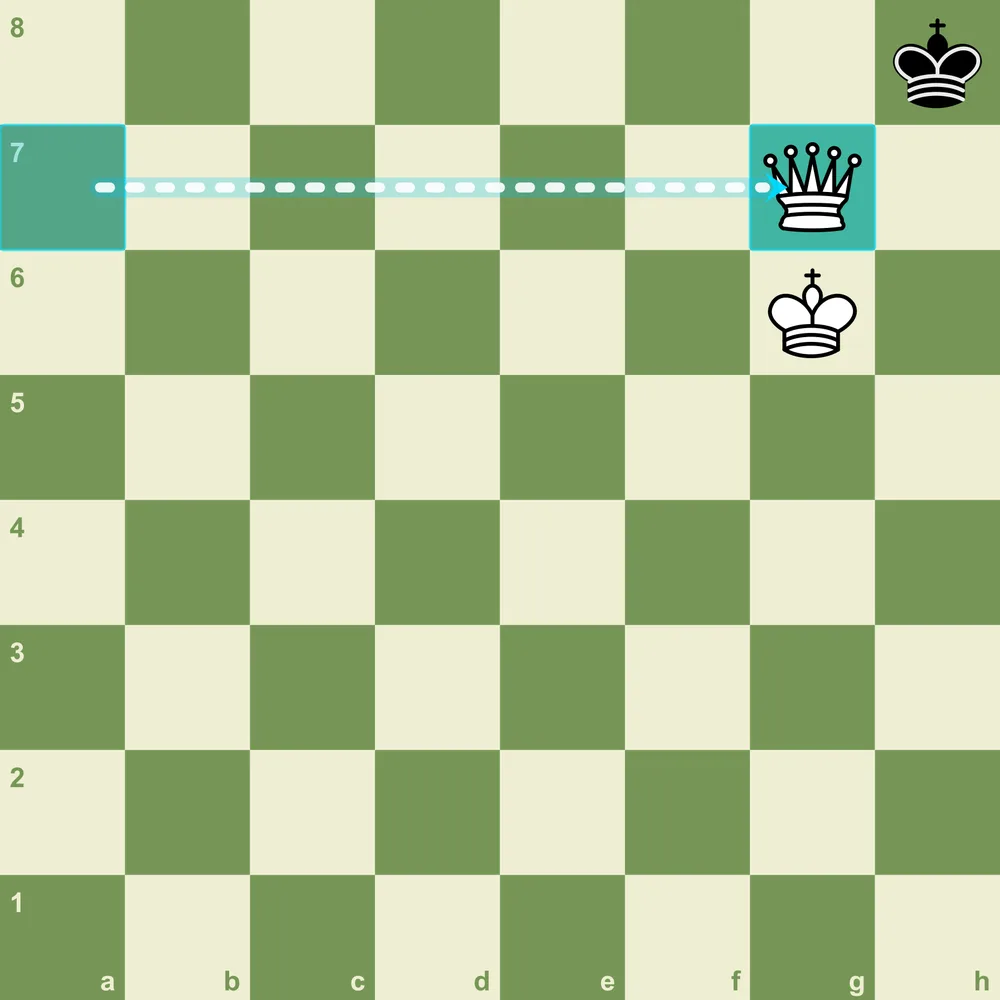
How it works: the enemy king must first be driven to the edge of the board, because a king in the open center always has escape squares. The queen shrinks the king's available space step by step, herding it toward a rank or file at the board's edge. Once the king is on the edge, you bring your own king up close, and then the queen delivers the final check on a square right next to the enemy king, protected by your king so it cannot be captured. In the diagram, the queen mates on g7 while the white king on g6 defends it, leaving the black king on h8 with no legal move.
To set it up efficiently, use the queen's ability to stay a knight's-move away from the enemy king. Keeping that exact distance mirrors the king's movements and steadily reduces its box without ever giving it a chance to escape. Push the king to the edge first, then march your own king into range, and only then look for the mating check.
The great danger to avoid here is stalemate. Because the queen controls so many squares, it is dangerously easy to leave the enemy king with no legal move while it is not in check, which is an instant draw. The safeguard is to shrink the king's box one step at a time and, before every queen move, confirm the king will still have at least one legal square until the moment you actually play checkmate with your own king supporting the queen.
Smothered Mate
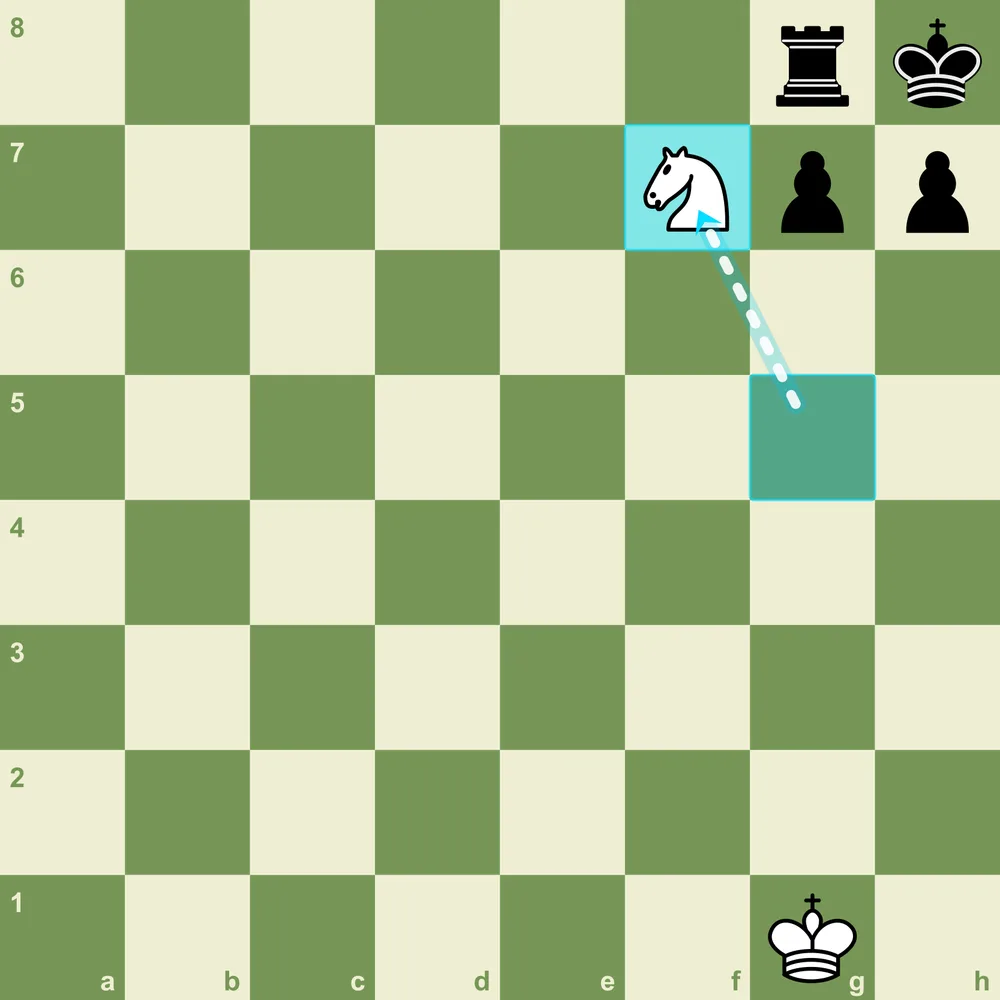
The smothered mate is the most spectacular pattern of the four, and beginners love it once they can spot it. It happens when a knight checks a king that is completely hemmed in, or “smothered,” by its own pieces. Because a knight's check cannot be blocked by any interposing piece, if the king has no free square and the knight cannot be captured, it is instant checkmate.
How it works: the enemy king sits in the corner on h8, boxed in by its own rook on g8 and its own pawns on g7 and h7. A knight leaps to f7 and gives check. The king cannot move because every surrounding square is occupied by its own men, the check cannot be blocked because it comes from a knight, and no defender can reach f7 to capture the intruder. All three mating conditions are satisfied at once. In the diagram, the knight lands on f7 to finish the game.
The classic way to set it up is the famous queen sacrifice known as Philidor's legacy. When the enemy king is cornered with only one escape square, you sacrifice your queen with a check that forces the defending rook to move onto that last free square, plugging the king's only exit. The knight then delivers smothered mate on the newly vacated pattern. It feels like magic, but it is a concrete, repeatable idea.
To avoid falling victim, be wary any time your castled king is crowded by its own pieces with no escape square, especially when an enemy knight is hovering nearby. The same luft that saves you from back-rank mates helps here too. Above all, treat an enemy knight that can reach the squares around your king as a serious threat, and make a flight square before it arrives rather than after.
How to Avoid Getting Checkmated
Learning these patterns is only half the battle. The same shapes that win you games can be aimed at your own king, so build these defensive habits into every game you play:
Make Luft Before You Need It
The most common way beginners lose is the back-rank mate. Once you have castled and the position stabilizes, spend a quiet move pushing a pawn in front of your king so it has an escape square. A single tempo spent on h3 or g6 can save you the whole game.
Guard Your Back Rank
Before you trade rooks or queens, ask whether the piece you are giving up was the only thing defending your back rank. Watch out for defenders that are pinned or overloaded, because a piece that cannot actually do its job is no defender at all.
Respect Enemy Knights Near Your King
Knights are the trickiest attackers because their checks cannot be blocked. If an opposing knight can jump to a square next to your king, treat it as a genuine threat and make sure your king is not smothered by its own pieces with no flight square.
Keep Your King Off the Edge in the Endgame
Both the ladder mate and the king-and-queen mate rely on driving your king to the rim of the board. In the endgame, fight to keep your king active and near the center for as long as you can, because a king in the corner is a king in danger.
Turn Winning Positions Into Wins
ChessHelper reviews your games and flags the checkmates you found, the ones you missed, and the mating nets pointed at your own king. Learn the patterns by seeing them in your real games.
Get Started FreeJoin 10,000+ players sharpening their finishing skills
Checkmate Patterns FAQ
Start with the back-rank mate. It appears in a huge number of real games because most players castle and then forget about the escape squares behind their king. Learning to spot an undefended back rank teaches you to look for the pattern both when attacking and when defending your own king. After that, master the king-and-queen mate, because it is the checkmate you will need most often to convert winning endgames.
Create luft, which is a small escape hatch for your king. Playing a quiet pawn move such as h3 or g3 (h6 or g6 for Black) at a safe moment gives your king a flight square so a single rook or queen check on the back rank is no longer mate. Beyond that, keep a defender aimed at your back rank, avoid trading off the rook that guards it, and watch for tactics that remove or overload that defender.
Stalemate happens when the enemy king is not in check but has no legal move. With a queen it is easy to trap the king so tightly that you take away every square at once without giving check. The fix is to use your queen to shrink the king's box one step at a time, keeping a knight's-move distance from the enemy king, and only bring your own king up to deliver the final mate. Always double-check that the king still has a legal move until the exact instant you play checkmate.